 Save to Pinterest
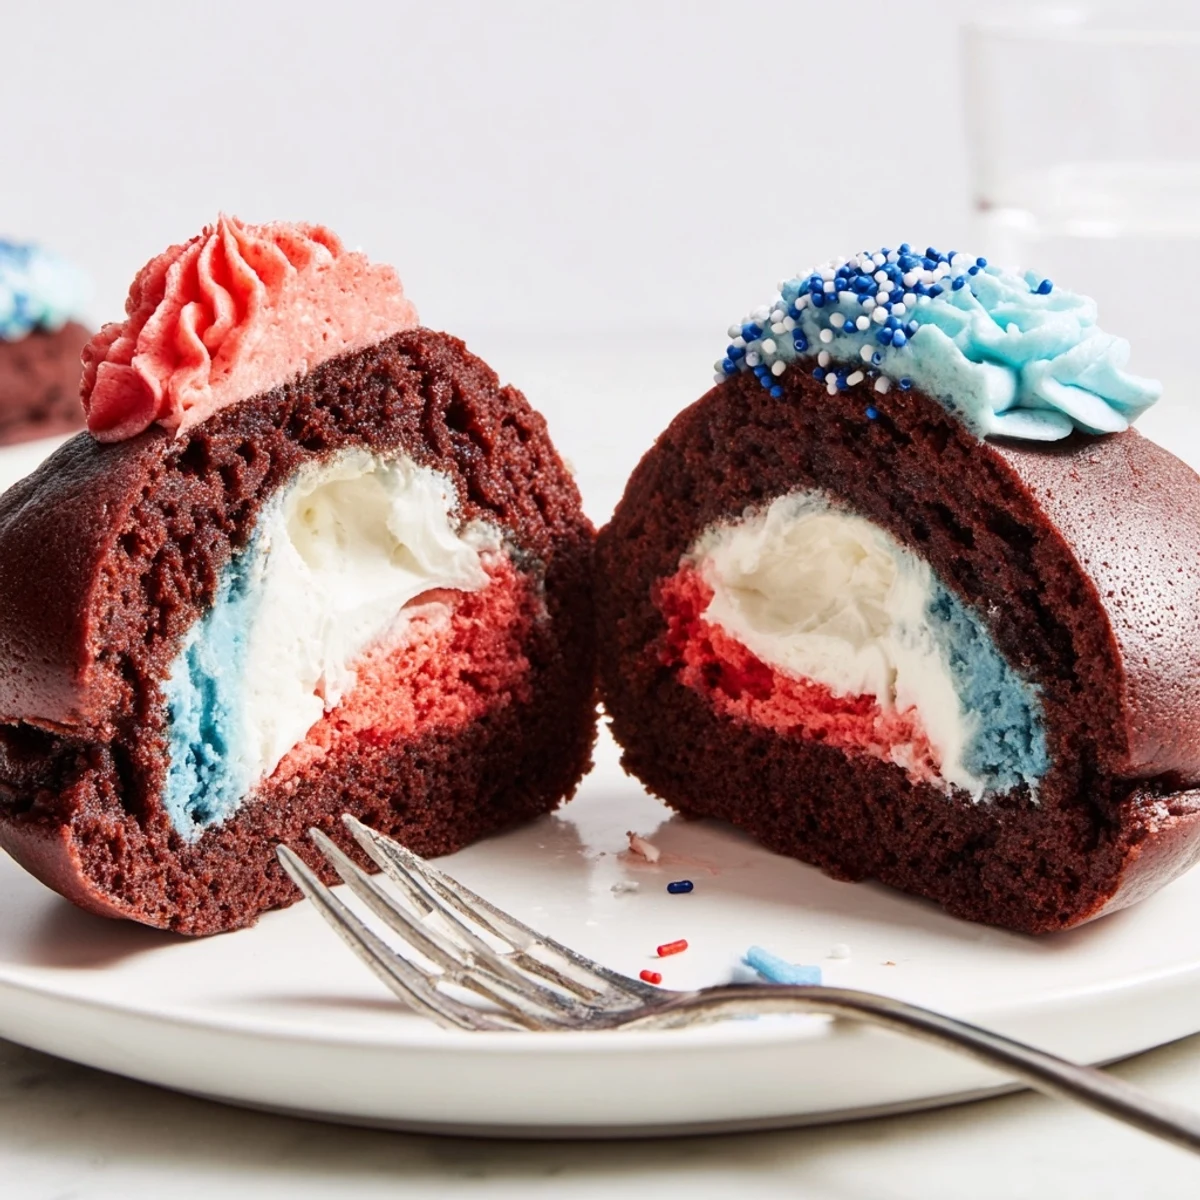
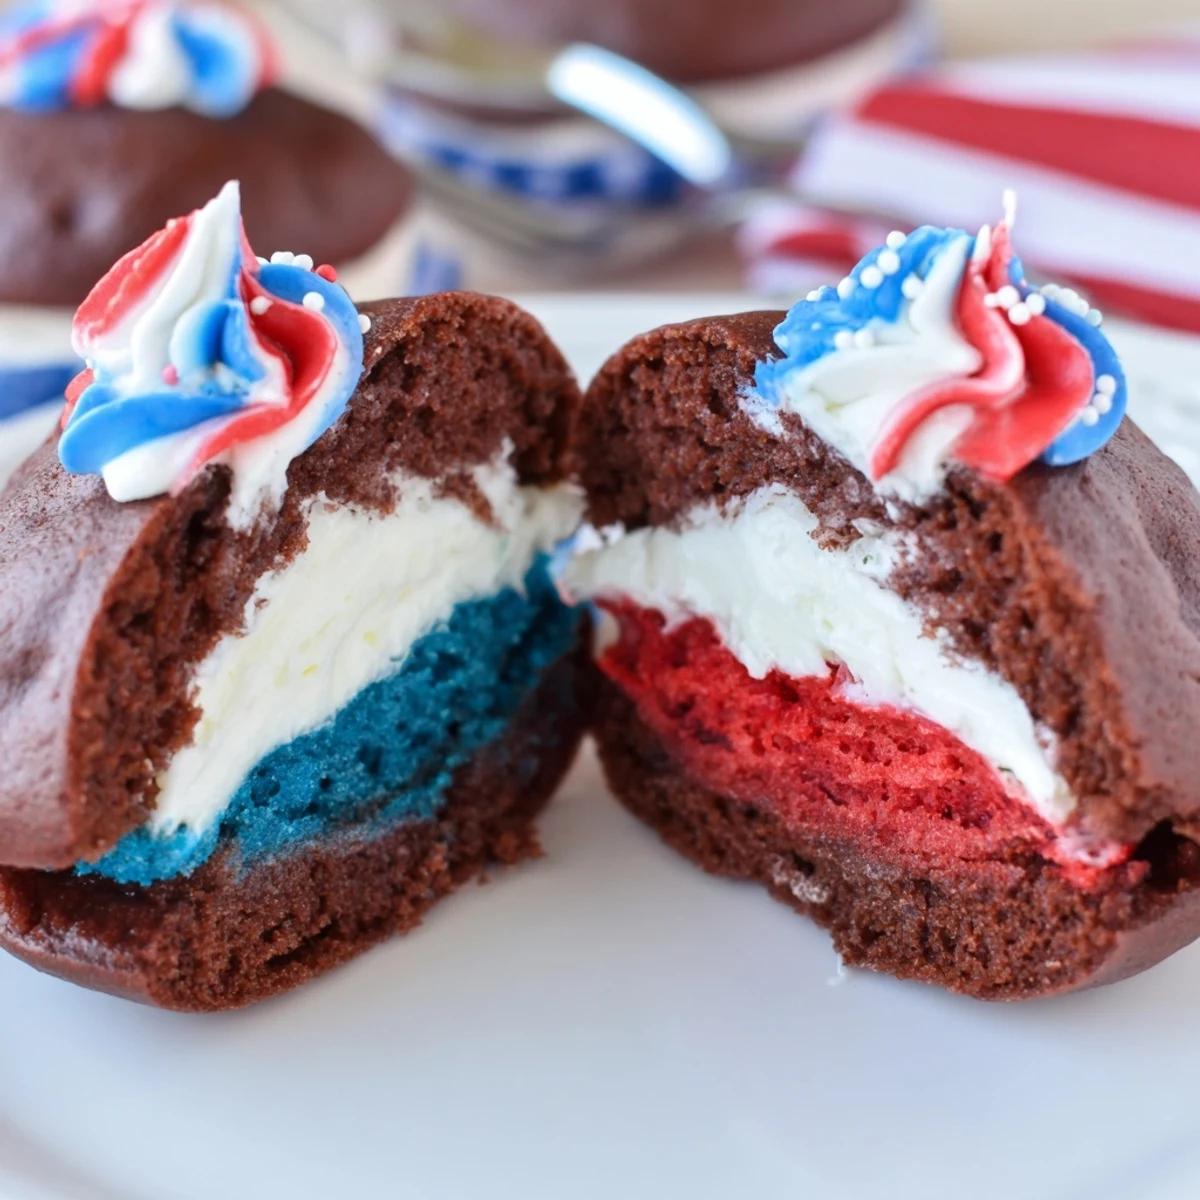
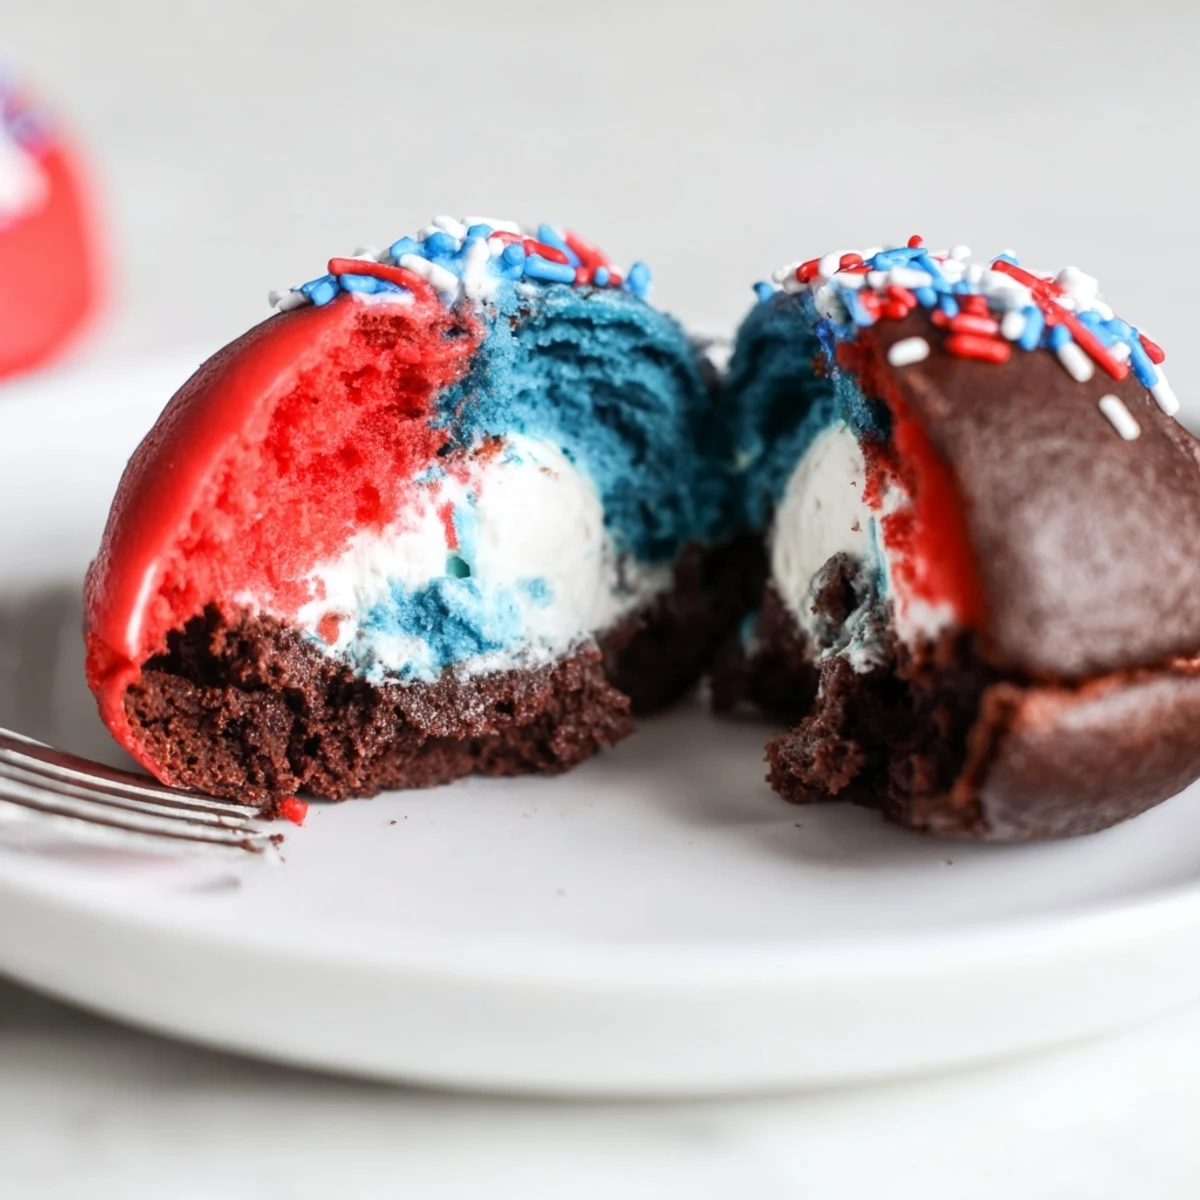
 Soft cocoa rounds are scooped and baked until springy, then paired with a light marshmallow buttercream. Divide the filling into white, red and blue portions, pipe between cooled cakes and roll the edges in patriotic sprinkles. Bake 10-12 minutes, cool completely and chill 30 minutes for easier handling; yields 12 sandwiches.
It wasn’t fireworks that first made me love July gatherings, but the swirl of laughter echoing from the kitchen as I piped vibrant buttercream onto pillowy chocolate cakes. There’s something wonderfully mischievous about smuggling red and blue-tinted frosting into a dessert, streaking my fingers with patriotic pride. Toss in a bit of glittery sprinkle chaos and suddenly, these whoopie pies felt like edible confetti for summer parties. Each year, someone new tries to sneak just one more before the parade starts.
Last Memorial Day, my niece helped me stir the batter and insisted we each sing a silly song for whichever color we dyed the filling. Flour dusted our shirts, patriotic sprinkles bounced across the counter, and that memory stuck to me just as stubbornly as the streaks of blue dye to her hands.
Ingredients
- All-purpose flour: Trusty for a tender crumb, be careful not to overmix or you risk dense cakes.
- Unsweetened cocoa powder: Gives the whoopie pies that chocolatey depth I crave every July—just sift if it looks clumpy.
- Baking soda: Lifts the cakes so they bake up airy and soft every time.
- Salt: Just a pinch balances out the sweetness—don’t skip it.
- Granulated sugar: Adds sweetness and helps the whoopie pies get just the right amount of crisp on the outside.
- Unsalted butter: Softened butter is a must for smooth mixing, and it always makes creaming with sugar a breeze.
- Large egg: Binds everything together; I always use one at room temperature so it blends seamlessly.
- Buttermilk: Its slight tang and moisture transforms the batter into something truly cake-like.
- Vanilla extract: Adds warmth; don’t be afraid to measure with your heart.
- Powdered sugar: For a dreamy, fluffy filling that pipes easily—just sift to avoid lumps.
- Marshmallow creme: The secret to getting the filling gooey but stable, and it makes me nostalgic for all things summer.
- Red & Blue food coloring: Go for gel if possible for rich, vibrant colors—the liquid kind just doesn’t pop as much.
- Patriotic sprinkles: The more, the merrier; coating the edges adds a festive finish that delights every kid I know (including the grown-up ones).
Instructions
- Prep and Line:
- Set your oven to 350°F and line two baking sheets with parchment; the crinkle as you smooth the paper always signals the start of something good.
- Whisk Dry Ingredients:
- Inhale the cozy aroma as you whisk flour, cocoa, baking soda, and salt—do this gently to keep the cocoa dust from decorating your shirt.
- Cream and Beat:
- With a mixer, blend butter and sugar until light and fluffy, then add the egg and watch the batter become beautifully creamy.
- Mix Wet and Dry:
- Stir in the buttermilk and vanilla, then slowly add the dry mix—go slow and steady, scraping the bowl so nothing stubborn gets left behind.
- Scoop Onto Sheets:
- Drop batter into two dozen rounds, spacing for rise; resist making them too large no matter how tempting.
- Bake and Cool:
- Bake 10–12 minutes until puffy and springy, then slide onto a rack to cool completely—stealing one warm is tradition.
- Beat the Filling:
- Cream butter, then blend in powdered sugar, marshmallow creme, vanilla, and salt until fluffy like midsummer clouds.
- Color Trio:
- Palette three bowls—leave one white, swirl one red, one blue, and revel in streaky fingers and shockingly bright spoons.
- Fill and Sandwich:
- Pipe or spoon fillings onto half of the cakes, then top with the rest—gently press for a satisfying squish.
- Add Patriotism:
- Roll edges in festive sprinkles or pipe a flourish on top for an extra cheer; the more color, the more smiles around the picnic blanket.
 Save to Pinterest
 One July evening, the entire family paused the movie to admire the platter of red, white, and blue treats—by the credits, nearly every last whoopie pie had vanished, replaced by sticky fingers and laughter that lingered long after.
Easy Ways to Customize Your Whoopie Pies
Tint the filling any shade you fancy or swap in your favorite sprinkle shapes for year-round celebrations. Sometimes I add a pinch of espresso powder to the cake for deeper flavor. If you're catering to different tastes, a few drops of mint or almond extract in the filling take these up a notch.
Allergy & Dietary Tips Not to Miss
One day when my cousin was avoiding gluten, I swapped in a measure-for-measure gluten-free flour blend—no one guessed, and she went back for seconds. Always double-check marshmallow creme and sprinkles for hidden allergens; ingredient labels can surprise you if you aren't careful. Dairy-free and egg-free versions are possible, but the texture changes slightly in the cakes.
Make-Ahead & Storage Tricks
Baked cakes can chill for a couple days unfrosted in the fridge so you can assemble at the last minute. I’ve learned that filled whoopie pies freeze beautifully wrapped in parchment and stored in an airtight container.
- Bring them to room temperature before serving for best texture.
- If transporting, keep them cool so the filling stays firm.
- Sprinkle edges just before serving to keep the colors vivid.
 Save to Pinterest
 I hope these whoopie pies become a centerpiece of your summer celebrations, sparking grins and moments you’ll remember as fondly as I do. They’re a little messy and a lot of fun—just as a good party dessert should be.
Recipe Questions
- → How do I get the cakes to be soft and cake-like?
-
Use room-temperature butter and buttermilk, mix until just combined, and avoid overmixing the batter. Scoop evenly and bake 10-12 minutes; they should spring back lightly when done.
- → What’s the best way to tint the filling without changing texture?
-
Use gel food coloring sparingly and fold it into small portions of the marshmallow buttercream. Gel pigments give vivid color without thinning the filling.
- → Can I make gluten-free whoopie cakes?
-
Replace the all-purpose flour with a 1:1 gluten-free flour blend that contains xanthan gum. Watch for slight differences in rise and adjust baking time by a minute or two if needed.
- → How should I store the assembled sandwiches?
-
Layer assembled sandwiches in an airtight container and chill; they hold well in the fridge for 3-4 days. For firmer filling and easier handling, chill for 30 minutes before serving.
- → Can I freeze whoopie sandwiches?
-
Yes. Freeze individually on a tray, then transfer to a sealed bag. Thaw in the refrigerator overnight to preserve texture and prevent melted frosting.
- → How can I make the sprinkles or colors more vibrant?
-
Use gel or paste food colorings for concentrated hues and choose high-quality sprinkles. Chill briefly before rolling to help sprinkles adhere cleanly to the filling edges.
