 Save to Pinterest
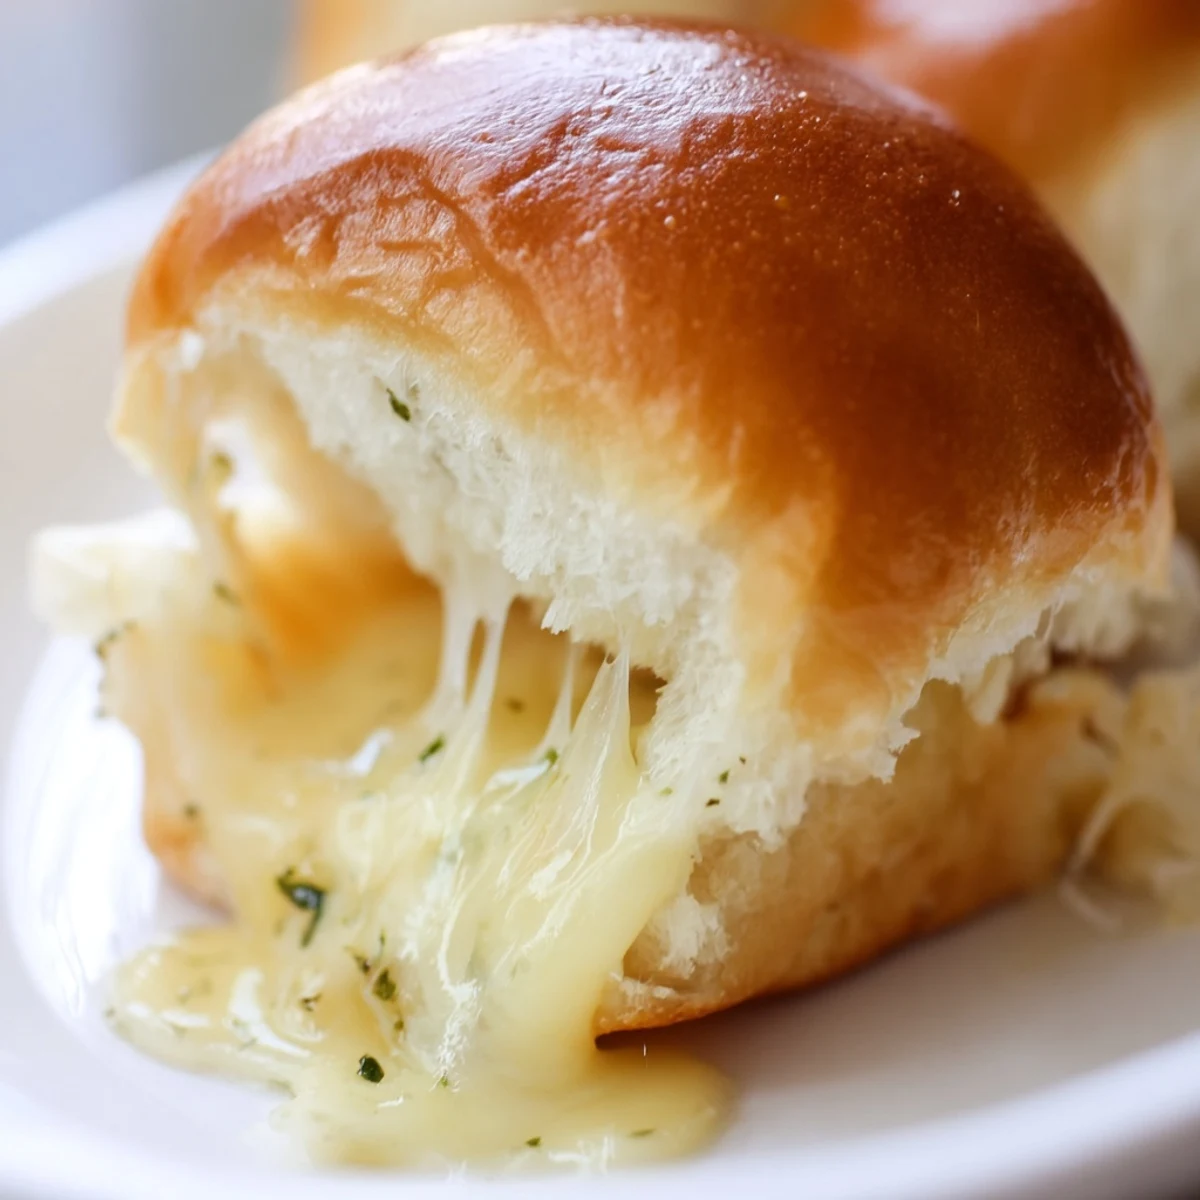
 These irresistible bite-sized sandwiches start with sweet Hawaiian rolls sliced in half and layered with cheddar cheese. A generous brushing of garlic-parsley butter transforms them into golden, crispy-topped delights. The oven does all the work—just 15 minutes at 350°F creates that perfect melty, gooey cheese center while the tops turn beautifully browned.
What makes these special is the contrast between sweet rolls and savory cheese, plus that aromatic butter coating. They're ideal for feeding a crowd since you can assemble twelve at once in one baking dish. Customizing is simple—swap in mozzarella for extra stretch, add ham for a heartier version, or slide in tomato slices before baking.
Best served warm while the cheese is still molten. They're remarkably simple: melt butter, mix in garlic and herbs, brush over stuffed rolls, and bake. No flipping required like traditional stovetop grilled cheese. The rolls stay connected during baking, making preparation faster and keeping everything neatly together.
The smell of butter and garlic hitting a hot oven always pulls everyone into the kitchen. I first made these for a Super Bowl party when I realized I had twelve hungry people arriving in thirty minutes and nothing ready to serve. They disappeared so fast that my friend asked if I'd made them at all or just imagined a really good snack.
Last Tuesday my daughter came home from school exhausted and wanting comfort food. I pulled these from the oven, that golden cheese stretching between each half as I separated them. She took one bite and said this was exactly what her bad day needed, which honestly made my entire week better too.
Ingredients
- 12 Hawaiian rolls: The slight sweetness here is what makes these special but plain slider buns work in a pinch
- 12 slices cheddar cheese: Sharp cheddar gives you that perfect melt though mozzarella or provolone create beautiful cheese pulls
- 4 tablespoons unsalted butter melted: Salted butter works too just skip the added salt in your mixture
- 1 teaspoon garlic powder: Fresh minced garlic adds more bite if you want to punch up the flavor
- 1 teaspoon dried parsley: Totally optional but adds those little green flecks that make everything look intentional
- 1/4 teaspoon salt: Skip this if using salted butter so you do not overdo it
Instructions
- Preheat and prep:
- Get your oven to 350 degrees and line a baking sheet with parchment paper for easy cleanup later.
- Slice the rolls smart:
- Cut through all the rolls at once horizontally keeping them connected so they bake evenly together.
- Layer the cheese:
- Place one slice on each bottom half letting the cheese drape slightly over the edges.
- Reassemble:
- Nestle the tops back onto the cheese bottoms like a cozy blanket.
- Mix the butter magic:
- Whisk together melted butter garlic powder parsley and salt until well combined.
- Brush generously:
- Paint that butter mixture over every inch of the roll tops getting into all the crevices.
- Bake to golden:
- Slide into the oven for 12 to 15 minutes until the cheese oozes out and tops turn beautifully browned.
- Separate and serve:
- Let them cool for just a couple minutes then cut into individual sliders.
 Save to Pinterest
 My neighbor smelled these baking through our shared wall and knocked on my door holding an empty plate. Now whenever I make them I double the batch because he shows up like clockwork every single time.
Make Ahead Magic
You can assemble these sliders up to eight hours before baking. Just wrap them tightly in foil and store in the refrigerator then add an extra two minutes to the baking time since they will be cold going in.
Cheese Swap Guide
Different cheeses bring totally different personalities to these sandwiches. Pepper jack adds a gentle kick while gruyère makes them feel fancy enough for a wine night with friends.
Serving Ideas
These little sliders work for everything from game day spreads to casual weeknight dinners alongside tomato soup. They are also genius at potlucks since they travel well and reheat beautifully the next day.
- Set out some mustard or spicy mayo for dipping
- Pile fresh basil leaves on top after baking for a pop of freshness
- These reheat at 350 degrees for about five minutes if you have leftovers
 Save to Pinterest
 There is something universally happy about pulling apart warm cheesy bread with people you love. That first bite when the cheese stretches and the butter hits your tongue just pure comfort on a plate.
Recipe Questions
- → Can I make these ahead of time?
-
Yes, assemble the stuffed rolls up to 4 hours before baking and refrigerate. Brush with butter mixture just before popping in the oven.
- → What cheese works best?
-
Sharp cheddar provides excellent flavor, but mozzarella creates that classic cheese pull. Provolone, Swiss, or a blend of melting cheeses work wonderfully too.
- → Should I separate the rolls before baking?
-
No, keep the rolls connected as a single unit while baking. This maintains moisture and makes assembly easier. Cut into individual pieces after baking.
- → Can I add meat to make them more substantial?
-
Absolutely. Thinly sliced ham, turkey, or cooked bacon placed between the cheese layers turns these into hearty sliders perfect for lunch or dinner.
- → How do I store and reheat leftovers?
-
Store in an airtight container for up to 3 days. Reheat at 350°F for 5-7 minutes to recrisp the tops and re-melt the cheese. Avoid microwaving as they'll become soggy.
- → Can I use regular sandwich rolls instead?
-
Yes, though the sweet Hawaiian rolls provide a distinctive flavor contrast. Regular brioche or potato rolls work as alternatives, just adjust baking time as needed.
